Last Updated on May 17, 2021 by Danny
Do you have an old drum kit that has been in the storage for way too long? It must probably have collected way too much dust and would have lost all the lustre it might have had when it was brand new.
While you might be thinking of just ditching the rusty drum set, you can actually clean up the old kit yourself. It doesn’t really have to be an expensive process, with just a little time and a little money you can make your drums sound as good as new.
Cleaning is not just the process of wiping the whole drum kit with a cloth and being done with it. Each part of the drum is unique in its material and parts, so you will have to use a different method for each. Read on further to know how to properly clean your drum set.
Things you need to clean the drum set
Understanding the drum kit material and knowing what drum cleaning products work best is important. While a drum might seem like a rudimentary instrument, it consists of many different parts. Each tiny part must be properly cleaned to get a good drum.
- Multi-surface cleaner
- WD-40 to remove rust and lithium-based lubricant for the lugs
- Microfiber cloth to clean the drums as a normal cloth will leave tiny scratches on the drums.
- Spray cans or permanent markers will be needed to cover up chipping.
- Finally, you will need a drum key to take the kit apart.
Cleaning the drum shells
Your first step before cleaning the shells would be to test if you have any loose lugs. This can be done by tapping the head and hearing if there are any rattling. Once you’ve found out all the rattly lugs, unscrew all the lugs and clean them. If you have any rusty lugs, either replace them or use WD-40 to clean off. If you have rattly lugs, stuff a little cotton wool into the lugs to prevent rattling.
Once you have taken the lugs off, properly clean the whole shell and remove any dirt found inside. You must use cleansers that will not seep into the drums and make them soft. The cleaning product must also not fade the colour of the shells, therefore avoid ammonium-based products.
The most important thing to remember on how to clean a drum set is don’t use an Abrasive cleanser as they will leave permanent scratches. If you do not want to spend money on cleaning solutions, you can use cheap home-made cleaner by mixing water and vinegar in a 50-50 solution.
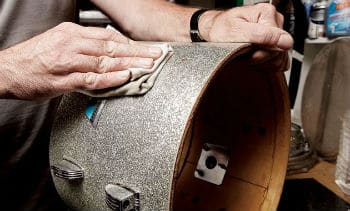
Once you have chosen a suitable cleanser, apply the foam spray over an area and use a microfiber cloth to clean it off. Then use a new microfibre cloth to dry off the kit. Work one section at a time as you don’t want to leave the cleanser on any area for too long. You should now have a drum shell with a spanking finish. Don’t spray on any insider part of the drum.
We have used Pledge Multi-surface spray [You can buy here] which is not harsh and smells great. It can be used for chrome, glass, and wood furniture. Make sure you don’t buy Pledge furniture cleaner as it can penetrate the wood.
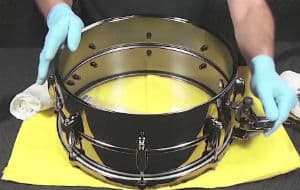
Cleaning the hardware
For cleaning the drum hardware, You can use the same cleanser which we have used for the shells above. However, if they do not seem to get the job done, you can use some chrome polish to clean them. Just make sure that the chrome polish must not come in contact with the drum shells as it will scratch it.
As with the rusty lugs, you can again use WD-40 to clean any rusty part on the hardware. If you have any chipped areas, you can use spray paint of suitable colour to cover it up. If you want to go really cheap, you can use permanent markers to cover up small areas of chipping.
Cleaning the drum heads
Two types of drum heads exist, clear plastic heads and coated heads. For a plastic head, you can use any non-ammonia based window cleaner. These will easily remove any dirt or stick marks. For a coated head, you must use a clean cloth that has been dampened. While there might be a little flaking of the coating, it is nothing to worry about and the heads will still sound good.
To remove sticky marks from the drum head, add a drop of shampoo and water on old toothbrush and rub it on the drum head.
Cleaning the cymbals

Cleaning the cymbals is never a pleasant job. Nearly all the solutions used for cleaning them have unpleasant odors. There are plenty of cymbal clearers in the market, but you will want to buy cleaners that are made by the manufactures of your cymbal. That’s what they suggest.
Well, going against their recommendation I tried this NEVER DULL POLISH on my cymbals and it showed excellent results. It is best for cleaning, polishing all metals, and won’t scratch delicate surfaces. Just use a small amount of Never dull cymbal polish on the cotton to apply on the cymbal and then wipe off the residue with a clean cloth. You will get new looking cymbals.
Finishing it off
Once everything has been properly cleaned, you will have to assemble the kit back. Apply a little lithium-based grease on lugs to make them easier to screw on. Once you have put everything together once again, you will have to tune the drums. While you can use a drum dial to properly tune the drum, they need to be bought separately. You can instead use some mobile app to help you tune the drums. While they are not as good as drum dial, they are inexpensive and get the job done.
Conclusion
Cleaning up a drum set is a pretty much inexpensive process and will get your drum to look and sound pretty close to the day it came out of the factory. If you are a gigging drummer who travels and practices a lot with your drum, you should do this more often.
A penultimate note, always keep your drums covered when they are not in use. Use a bed sheet or a blanket to ensure that dust doesn’t settle on the drums. And finally, playing drums often is a much easier and enjoyable way than cleaning to keep dirt away from your drums.